Blender is a free open source 3D program. With Blender and this set of tools, you can create 3d meshes to be used in TS3 as objects, i.e. chairs, tables, ect. You can get Blender 3d 2.65a here.
THIS WORKS FOR BLENDER 2.63-2.65a AND IS ONLY FOR OBJECTS.
Features
- Import/export - import/export MLOD and MODL files(.s3m2b)
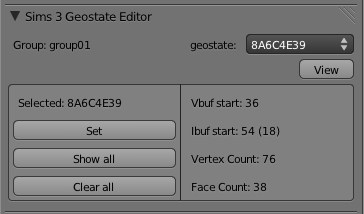
- Geostate Editor - editor for geostates(multistate objects)
- EZ Bake - bake multiplier, rgb, and specular images with just a few clicks
- Image Loader - apply images to objects and get and idea how they will look in-game(including alphas)
- Mesh Swap - swaps your mesh with the imported EA mesh.
- Create ShadowMesh - makes a mesh into a sunshadow mesh by correctly sizing and positioning
- Fix Seams - fix unsightly seams created when splitting vertices/edges(aligns vertex normals)
- Make Glass - automagically give a group a glass material with one click(Blender viewing only)
- Hide Bones - hide/show the bones in an object with one click
- Add Lights - adds a four point lighting set up for checking specularity
- Drop Shadow Strength - adjust the strength of dropshadows
Installation
1. Download and extract the "io_TS3_tools.py" and put it where you can find it.
2. Start Blender and go to File->User Preferences(or press CTRL+ALT+U).
3. Click the "Add-Ons" button at the top of the User Preferences window.
4. Click the "Import/Export" button on the left, then click the "Install Add-On" button at the bottom.
5. Navigate to where you extracted the file and select the "io_TS3_tools.py" and click "Install Add-On". TS3 Tools is added to the the list.
6. Click the check box to the right of the TS3 Tools in the list. The importer/exporter is added to the File->Import menu, and the TS3 Tools and TS3 Image Loader panels are added to the Properties Editor under Scene.
7. Close the User Preferences window, and hit CTRL+U to save as default(if you want TS3 Tools to be there next time you start Blender).
Importing/Exporting
You will need the latest QA version of S3PE to use this script. and the latest MeshExpImpHelper
Importing
1. Select the MLOD/MODL in s3pe, right click on it, and select "to s3m2b". Save the file in it's own folder.
2. Start Blender, and in the Properties editor under Scene, click the Import button in the TS3 Tools panel or go to File->Import->Sims 3 MLOD/MODL. Navigate to the your folder and select the name_filebase.s3m2b file.
When creating you new mesh, to keep sharp edges, you will have to use the Edge Split modifier. Also, UV mapped parts that are separated on the map should be split in the mesh. The exporter only exports changes made in Edit Mode, changes made in Object Mode are ignored.
To assign a new mesh to a group
1. Right-click on the new mesh(s), the hold SHIFT and right-click on the mesh you want to replace.
2. Click the 'Swap' button.
To assign vertices to the joints
1. Right-click on the mesh and press TAB to go into Edit mode.
2. Select the vertices you want to add to a joint. In the Properties editor, select the "Object Data" panel(button with triangle/w dots at the corners).
3.In the "Object Data" panel under 'Vertex Groups', select the joint you want to assign to, and click assign.
Exporting
1. In the Properties editor under Scene, click the Export button in the TS3 Tools panel or go to File->Export->Sims 3 MLOD/MODL. If you haven't triangulated your meshes(CTRL+T in Edit mode), click the Triangulate checkbox in the export options panel(bottom-left of the file select window). Navigate to the folder you imported from, select the name_filebase.s3m2b file, and press "Export MLOD/MODL".
2. In s3pe, open the package. Right-click on the MLOD/MODL you exported from and select 'from s3m2b'. Navigate to your newly created .s3m2b file and click 'Open'.
Exclude from Export
This function allows you to specify groups to be left untouched on export. Any groups with this setting will be skipped during export, leaving the original group unedited. This is perfect for making beds, as you can exclude every group but the frame and dropshadow, and edit them without having to worry about borked normals on the mattress due to Blender recalculations. Just select the group(on at a time) to exclude and press the 'Exclude from Export' button. Do the same to re-include a group.
Blender Tools
Downloads offline
Blender is a free open source 3D program. With Blender and this set of tools, you can create 3d meshes to be used in TS3 as objects, i.e. chairs, tables, ect. You can get Blender 3d 2.65a here.
THIS WORKS FOR BLENDER 2.63-2.65a AND IS ONLY FOR OBJECTS.
Features
- Import/export - import/export MLOD and MODL files(.s3m2b)
- Geostate Editor - editor for geostates(multistate objects)
- EZ Bake - bake multiplier, rgb, and specular images with just a few clicks
- Image Loader - apply images to objects and get and idea how they will look in-game(including alphas)
- Mesh Swap - swaps your mesh with the imported EA mesh.
- Create ShadowMesh - makes a mesh into a sunshadow mesh by correctly sizing and positioning
- Fix Seams - fix unsightly seams created when splitting vertices/edges(aligns vertex normals)
- Make Glass - automagically give a group a glass material with one click(Blender viewing only)
- Hide Bones - hide/show the bones in an object with one click
- Add Lights - adds a four point lighting set up for checking specularity
- Drop Shadow Strength - adjust the strength of dropshadows
Installation
1. Download and extract the "io_TS3_tools.py" and put it where you can find it.
2. Start Blender and go to File->User Preferences(or press CTRL+ALT+U).
3. Click the "Add-Ons" button at the top of the User Preferences window.
4. Click the "Import/Export" button on the left, then click the "Install Add-On" button at the bottom.
5. Navigate to where you extracted the file and select the "io_TS3_tools.py" and click "Install Add-On". TS3 Tools is added to the the list.
6. Click the check box to the right of the TS3 Tools in the list. The importer/exporter is added to the File->Import menu, and the TS3 Tools and TS3 Image Loader panels are added to the Properties Editor under Scene.
7. Close the User Preferences window, and hit CTRL+U to save as default(if you want TS3 Tools to be there next time you start Blender).
Importing/Exporting
You will need the latest QA version of S3PE to use this script. and the latest MeshExpImpHelper
Importing
1. Select the MLOD/MODL in s3pe, right click on it, and select "to s3m2b". Save the file in it's own folder.
2. Start Blender, and in the Properties editor under Scene, click the Import button in the TS3 Tools panel or go to File->Import->Sims 3 MLOD/MODL. Navigate to the your folder and select the name_filebase.s3m2b file.
When creating you new mesh, to keep sharp edges, you will have to use the Edge Split modifier. Also, UV mapped parts that are separated on the map should be split in the mesh. The exporter only exports changes made in Edit Mode, changes made in Object Mode are ignored.
To assign a new mesh to a group
1. Right-click on the new mesh(s), the hold SHIFT and right-click on the mesh you want to replace.
2. Click the 'Swap' button.
To assign vertices to the joints
1. Right-click on the mesh and press TAB to go into Edit mode.
2. Select the vertices you want to add to a joint. In the Properties editor, select the "Object Data" panel(button with triangle/w dots at the corners).
3.In the "Object Data" panel under 'Vertex Groups', select the joint you want to assign to, and click assign.
Exporting
1. In the Properties editor under Scene, click the Export button in the TS3 Tools panel or go to File->Export->Sims 3 MLOD/MODL. If you haven't triangulated your meshes(CTRL+T in Edit mode), click the Triangulate checkbox in the export options panel(bottom-left of the file select window). Navigate to the folder you imported from, select the name_filebase.s3m2b file, and press "Export MLOD/MODL".
2. In s3pe, open the package. Right-click on the MLOD/MODL you exported from and select 'from s3m2b'. Navigate to your newly created .s3m2b file and click 'Open'.
Exclude from Export
This function allows you to specify groups to be left untouched on export. Any groups with this setting will be skipped during export, leaving the original group unedited. This is perfect for making beds, as you can exclude every group but the frame and dropshadow, and edit them without having to worry about borked normals on the mattress due to Blender recalculations. Just select the group(on at a time) to exclude and press the 'Exclude from Export' button. Do the same to re-include a group.
top